0 Abstract
This online course is about programming the well known STM32-Mircocontroller, that are based on an ARM(R)-Cortex design. It is especially designed for those who are migrating from the more or less “easy going”-oriented AVR 8-bit-MCU family to the more sophisticated STM32-ARM-Cortex devices. It is also designed for those who are coming from other platforms like PIC-controllers for example.
In this course we will focus on the STM32F4-family (ARM-Cortex-M4), a group of controllers that has been labeled by the manufacturer as “high performance” types.
During this 1st lesson you will learn how to set up your software developing environment, connect it to your hardware and do some basic port set up exercise to configure ports as out- and input.
1.0 STM32 – A modern high-performance microcontoller
The STM32 controllers are based on a microprocessor design developed by the “ARM” company. “ARM” is an abbreviation of the term “Acorn Risc Machines” which refers to the UK based ACORN microprocessor producers that issued the first models of this architecture in the early 80s of the last century.
Like the AVRs these ARM processors have been designed as Reduces Instruction Set Computers, that means their set of basic instructions is not that complex. They process 32 bit in parallel, most of the registers are 32-bit wide but some also have 16-bit width. Ports have a bit widths of 16 bits. Clock rates of these machines are up to 168 MHz. All settings in hardware on the controller are done by software once the program has started, there are no “fuses” AVR software enginieers might have been confused with.
Another story: ARM itself does not produce chips but only issues a license for other companies developing their own processors based on the ARM model. Thus you can buy ARM processors from a wide range of manufacturers wheres STM-Microelectronics is only one of them.
ARM processors offer a wider range of functions, are more complex and have more integrated functions than AVR controllers. Thus programming these modules is not that easy compared to the ATMEL products. We will cover the basic hurdles to be taken by beginners.
1.1 Get Hardware
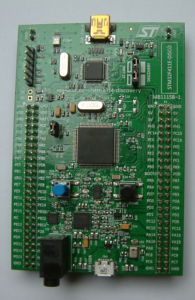
For developers STM32 controllers are best purchased as pre-manufactured hardware with all the necessary peripherals mounted on a board of circuitry. There are lots of various “Breakout”- or “Discovery”-Boards you can purchase. Many people use the original STM32F4 “Discovery” board (also referred to as “Disco” board even when you can’t dance on it), left picture.
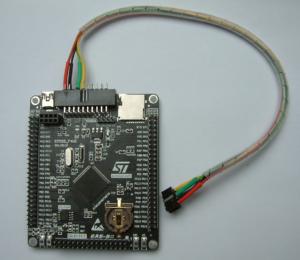
Other affordable hardware comes from China based vendors where you can buy the STM32F407VET6 blackboard for example that contains extra flash memory, a socket for the NRF24L01 wireless module and some other features. This board is definitely a good start to dive into the world of STM32F4 (center).
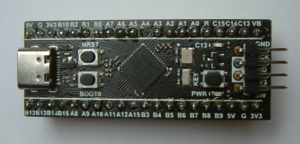
If you prefer a smaller versions of hardware you can purchase the so-called “Black Pill“-boards that contain an STM411 MCU with fewer pins and some features missing (among them the DAC) that the larger units have on board (right).
1.2 In-system-programming (ISP)
In earlier times it was common to take the processor IC out from its socket and plug into a special programmer device when you wanted to program it. Modern microcontrollers have an interface called “IS” to load the software to the chip when it is installed into the circuit. As known from the AVR world, ISP (in system programming) is also present with the STM32 MCUs. So, further on you need an ISP programmer at least for most boards except from e. g. the STM original “Disco” board. The “Disco” has a compatible programming interface already on board.
The required ST V2 Programmer device also is available via the internet.
All boards have 4 pins to connect the USB programmer device.
- VDD (+3.3V)
- GND
- SWDIO (data line)
- SWCLK (clock line)
If you are searching where to connect your board if this hasn’t got a standard interface connector you can switch to the “Board” menu of STM32-Base Website.
The easiest way to “flash” your device with software is to use the SWDIO line (PA13) and SWCLK line (PA14). The programmer also is able to power your board but not necessarily the peripheral hardware in every case. USB power supply is limited to 0.5A (or 0.1 A in low power devices).
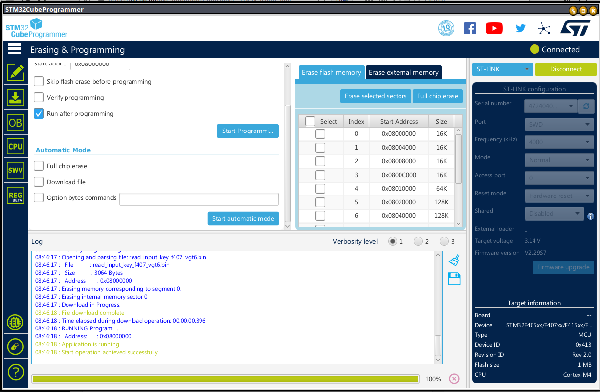
As programming software there is STM-Cube-Programmer available. Click on the picture to get this software!
1.3 Software design: The 2 ways of programming: “bare metal” or “register programming” vs. “HAL”
When you remember AVRs, you have two choices to produce software for these controllers:
- Programming in Assembler, C or another language and writing all the necessary program code on your own, or
- using the ARDUINO environment and taking advantage of a lot of predefined functions that make programming more easy.
In the STM-world you also have two ways similar to that. On one hand you can use a large library called “HAL” which stand for “hardware abstraction layer”. This decouples the MCU’s hardware from your application. The software developer communicates with some sort of interface that provides lots of predefined functions for the daily programming routine. The code reads a little bit like “Arduino code”.
The other way is called “bare metal” programming where the software engineer has to create all the necessary functions for himself.
We will cover this2nd way of programming because it gives you a better understanding of what is behind the curtain of the MCUs we use here. This method also is also called “register programming”. It is the same type of coding that the non-Arduino developers know from the AVR-world when designing software in C or another language.
1.4 Choosing a programming environment
1.4.1 Chose an editor
There are lots of integrated programming suites and IDEs (user interfaces) on the market. When you use a search engine (“stm32 programming environment”) you will find items like “KEIL”, “STM32CUBE”, “CooCox” etc. etc. You can use them, for sure.
But there is a much easier and leaner way. Choose your well-known programming editor you have used so far. This approach is, to my point of view, the best idea because you are probably already familiar with. If you haven’t got one yet, the author’s recommendation is Geany.
1.4.2 Install a software environment
With STM32F4 MCUs the process of generating an executable code that can be uploaded to the MCU involves a little bit more effort than in the AVR world. You need, as always, tools like a compiler, a linker software etc. The following steps should be taken:
First, create a folder called “ARM” on your local drive. That will be your workspace.
Second download the GCC ARM Compiler suite from this website. Unpack and install into a new folder called “tools”. This will match with the naming used in the second step.
Third you need software that defines the working environment for you respective STM32 MCU.
1.4.2.1 The need for a “startup-file”
Before you can start your own software running in the MCU a piece of very special code is required. This code is a so called “Startup” file. It exists for a very simple reason: The memory structure of the various STM32 MCUs varies between the single models. Therefore the respective memory model has to be specified in software and definitions have to be made. This is done by a file that is called “Start-Up file”.
It defines the different sections of memory (FLASH, SRAM) , interrupt vectors etc. for the processor that your code can access. In addition it fixes the jump to a function called SystemInit() that is called before your main() function is accessed. In SystemInit() basic settings like the clocking of the MCU are defined. After that process is terminated, your main()-code will be executed.
Usually the Startup-file is an assembler file, sometimes it can also be a C-file. This file depends on the exact processor subtype you are using.
1.4.2.2 Get the whole software environment as a package
To avoid bothering with this and all the more or less complex prerequisites you can download a fully featured software package from STM32-Base website. This website also contains information about the “Discovery”- or “Breakout”-Boards and other hardware. Follow the instructions mentioned under the Setup guide of that website. It will give you a full working environment to start with. By the end of the install procedure you must still add 2 symbolic links. Using Linux the command for this is “ln -s /full/path/STM32-base STM32-base” etc.
After this you will have installed a working programming environment and can start working with your own .c-file stored in the /templates/src folder named main.c.
If you are already sophisticated you can adapt the various makefiles by changing the source name and other settings. If you are not, leave everything as it is.
1.5 Recommended reading
If you got used to avoiding intense reading boring hardware manuals like it was when you still lived in the AVR world: Forget it! As STM32 MCUs are much more complex you won’t get along by “try and error”. RTFM (read the f…. manuals!) is mandatory now.
You will needthis stuff at least:
- The STM32F4 datasheet which contains the basic features about the MCU you have in use (Collection of STM32F4 datasheets)
- The STM32F4 Reference Manual that gives a detailed description of the various functions, the registers involved etc. Don’t worry. About 1700 pages are waiting to be explored. No worries, it sounds more complicated than it is!
Have fun programming and thanks for attending this lesson!
All rights reserved by Peter Baier, Bad Bergzabern, Germany (https://micromaker.de).